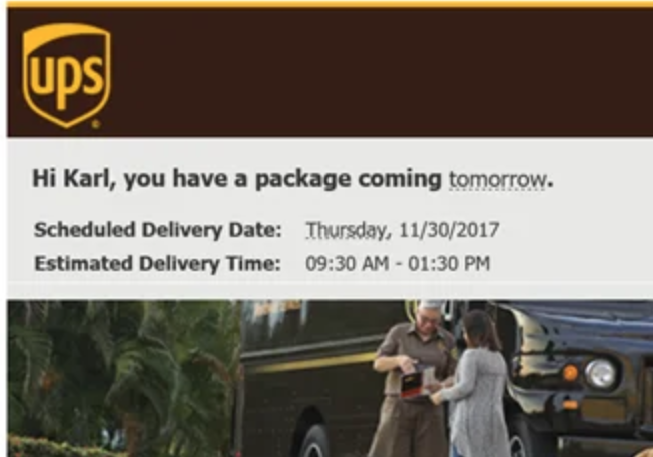
• May 2024
    M T W T F S S
     12345
    6789101112
    13141516171819
    20212223242526
    2728293031  
  • Latest Posts

  • Latest Comments

  • Archives

No Startup Sound for Windows 10

At least by default it doesn’t seem there is a startup sound. This is GREAT!

I travelled this week and have no idea how many times I heard the Windows 7 startup sound. Why do you need a sound? The only real reason I can think of is because the startup is so slow. The user has gone on to other tasks and you need to let them know, “Hey! I’ve actually done something now.”

But Windows 10 on my Surface Pro 4 is pretty fast for booting. It’s so nice to open it up in a meeting and not have to lunge for the volume so you don’t disturb the meeting.

Stated a different way, LOTS of people this week disturbed others as they started up their devices. They respond with a sheepish and embarrassed smile, but it’s not really their fault – it’s Microsoft. Or was. But not any more.

Thank you Microsoft for realizing that just starting a device isn’t noteworthy of announcing the the entire room or airplane.

Yours truly,

An Introvert

How can I unit test unsubscribing from an event? (C#)

I’ve seen some strange bugs that occur when you don’t properly unsubscribe from events. But it seems I’m always stuck when it comes to unit testing that.

Well, I use Moq for most of my mocking and there are some techniques you can use for testing that your subscribed, namely by Raise(ing) the event in a mock.

But I always struggle when trying to see if I actually unsubscribe in my code. Here is a simple sample that shows how you can do it with very little code.

Here is all the code:

Code Snippet
  1. public interface IHasEvents
  2. {
  3.     event EventHandler BeginRequest;
  4. }
  5.  
  6. public class ClassUnderTest
  7. {
  8.     internal IHasEvents ClassWithEvents { get; set; }
  9.     public ClassUnderTest(IHasEvents classWithEvents)
  10.     {
  11.         ClassWithEvents = classWithEvents;
  12.         ClassWithEvents.BeginRequest += OnBeginRequest;
  13.     }
  14.     public void Dispose()
  15.     {
  16.         // Yes… there are code analysis warnings here… But I want to keep simple.
  17.         ClassWithEvents.BeginRequest -= OnBeginRequest;
  18.     }
  19.  
  20.     public void OnBeginRequest(object sender, EventArgs e) { }
  21. }
  22.  
  23. public class MockHasEvents : IHasEvents
  24. {
  25.     public int BeginRequestSubscriberCount { get; set; }
  26.     public event EventHandler BeginRequest
  27.     {
  28.         add { BeginRequestSubscriberCount++; }
  29.         remove { BeginRequestSubscriberCount–; }
  30.     }
  31. }

And here is the code that tests that the constructor subscribes and the Dispose() unsubscribes.

Code Snippet
  1. [TestClass]
  2. public class ExampleEventMockTest
  3. {
  4.     [TestMethod]
  5.     public void Constructor_Subscribes_To_BeginRequest()
  6.     {
  7.         // Arrange
  8.         var expected = 1;
  9.         var hasEvents = new MockHasEvents();
  10.  
  11.         // Act
  12.         var subject = new ClassUnderTest(hasEvents);
  13.  
  14.         // Assert
  15.         var actual = hasEvents.BeginRequestSubscriberCount;
  16.         Assert.AreEqual(expected, actual);
  17.         //actual.Should().Be(expected); // I usually use FluentAssertions.
  18.     }
  19.  
  20.     [TestMethod]
  21.     public void Dispose_Unsubscribes_From_BeginRequest()
  22.     {
  23.         // Arrange
  24.         var expected = 0;
  25.         var hasEvents = new MockHasEvents();
  26.         var subject = new ClassUnderTest(hasEvents);
  27.  
  28.         // Act
  29.         subject.Dispose();
  30.  
  31.         // Assert
  32.         var actual = hasEvents.BeginRequestSubscriberCount;
  33.         Assert.AreEqual(expected, actual);
  34.     }
  35. }

I hope this helps others.

Live Writer Lives On!

This is my first blog post being written from Open Live Writer. I suspect there are so many people to thank that I wouldn’t even know where to start.

Details

I’ve used Live Writer for years to create blog posts. When it looked like Live Writer would go away I probably tried 10 other authoring tools (too long ago to remember which ones). And each time I thought, “But Live Writer did it right. It’s easy. It meets my needs.” So I was thrilled when Microsoft agreed to allow it to become open source.

Below is an image of Windows Live Writer on one computer and Open Live Writer on the other. You can’t really tell the difference!

image

Of course I guess one place to start thanking is Microsoft and Microsoft employees for making the source code available and the decision to allow it to become open source.  Of course, I’m sure that’s when the real work began and I see the list of contributors on the site is quite long. Thank you all!

Software Development Metrics

Headline: For modern software development I’ve been working on some key metrics that seem to correlate to high quality and profitable software.

List of Metrics

  • Number of customer reported bugs
  • Automated test code coverage
  • Completed user stories
  • Code analysis warnings
  • Changesets per day
  • Regressive bugs
  • Number of broken builds

Profitability

There are two components to profitability – how much money you make (revenue) and how much you spend (expenses). These metrics contribute positively to both. But for the revenue I would encourage early and frequent feedback from customers through Customer Preview Programs.

Revenue

So how do these metrics improve revenue? Obviously software with few customers bugs is more attractive to users. I’ve seen software that was so buggy that customers switched to a different solution. I’ve also been on the other side where the software was of such high quality that customers bought it in large part because it “just worked”.

In addition to stability of the software, velocity helps too. You don’t want to nag your customers with daily updates, but you don’t want to wait 18 months between releases – particularly for fairly new software. High code coverage, numerous completed user stories, and changesets all contribute to higher release velocity. You can release more frequently if your test cycles are short. And there’s reason to ship more frequently if you’ve added the top priority user stories from your backlog.

Expense

On the expense side good performance on all of these metrics contributes to low expenses.

If you have few customer reported bugs you’re spending time on user stories and not bugs.

Automated test coverage reduces the testing time and prevents injection of new bugs. Or at least detects them at the earliest possible moment – before you even check in your code (if your running all your tests as you should). Automated test coverage also reduces the staffing level needed for testing. Most domain experts spend their time determining whether the features work as desired (usability and usefulness) and not looking for bugs (the software didn’t do what the user expected).

If you can complete user stories quickly, that reduces cost. That is, the cost per user story is low.

Keeping code analysis warnings at zero helps prevent bugs too.

Changesets per day usually correlates to the completion of user stories.

Regressive bugs means that the software used to work but when you implemented new functionality you broke something. Of course this takes time which increases expense of the project, just to get back to where you were.

And finally, if your build is always broken then it is hard to ship and usually prevents developers from being productive.

Targets

So these are some metrics, but what are some good targets for these? While the answer may vary based on the size of your project and development team, this gives some view of that.

Customer Reported Bugs – I’ve seen sizable projects have only 1 or 2 customer reported bugs after several years. I’ve seen at least 10 such projects. So this is not a crazy target. So your target should be zero. But a small number shouldn’t deflate you Smile

Automated Test Coverage – Almost all of those 10 projects had greater than 95{f073afa9b3cad59b43edffc8236236232bb532d50165f68f2787a3c583ed137f} code coverage. Obviously strive for 100{f073afa9b3cad59b43edffc8236236232bb532d50165f68f2787a3c583ed137f}, but there are times where you just can’t test several lines.

Completed User Stories – this is much harder to set a target for. What is the size of your user stories? What is the size of your team? If you simply look at user stories you complete, then you remove one of these factors. I feel pretty good if I can complete 1-3 user stories each week. I don’t feel good if I complete 0.

Code Analysis Warnings –  Zero!

Changesets per Day – The most productive and high quality code I’ve seen is usually written by developer that have 3 to 4 checkins per day. It seems that I run across 3 groups:

  1. Developers that break code into small testable pieces that follow the SOLID principles and have 3-4 checkins each day.
  2. Developers that have 2-3 checkins per week.
  3. Developers that have 1 or 2 checkins per month.

I did see several developers once that would checkin code about once every 2 to 3 months – or about 4 to 6 times per year!

Now don’t “Check in just to check in”. But as you build your code base and keep it high quality, it should become easier and easier to add new functionality more frequently.

Regressive Bugs – Zero! This is usually a sign you’re missing some critical automated tests.It’s not much fun to go back and get your code to do what it used to do. The whole purpose of agile software development is to keep moving forward.

Number of Broken BuildsZero! Now that’s harder I think than the code analysis warnings. but I hope the build is never broken for more than 1 hour. (Which of course means you keep your code lean and your build can run in less than 1 hour.) And this is much easier to accomplish if you are checking code in every few hours. The most you’ll lose if you back out a change is a few hours work.

I’d be interested if you have other metrics for high quality software development.

What’s Your Quality Bar?

I put “New Horizontal Tab Group”, “Run Code Analysis on Solution” , and “Analyze Code Coverage for All Tests” on a Visual Studio Toolbar called “Quality”.

Before you check-in

The steps before checking in code should be:

  • Get Latest Version
  • Build
  • Run Code Analysis on Solution
  • Analyzed Code Coverage for All Tests

Most advice as the first two and probably the last listed, but I think all 4 are important.

To make this easier and almost automatic, I put together a tool bar so I can just press a button for two of these actions.

image

Now I renamed these so that they don’t take up as much room, but they are there.

Get Latest Version

You want to make sure that you have all the latest code merged in with yours before you do your check-in, so this is the first step. If you don’t do this first then you’ll need to repeat some steps again before checking in.

Build (Skip)

Ok… I actually skip this, because it happens automatically in the next two steps.

Code Analysis

I have Microsoft All Rules turned on for Code Analysis.

image

But even though you check the box that says “Enable Code Analysis on Build” it doesn’t seem to report these warnings. So instead, I need to run “Run Code Analysis on Solution”. Our projects have no code analysis warnings (with very few suppressions). You want to get to zero and stay there. It’s always an expensive effort to go back and get them down to zero when they start to pile up.

Code Coverage

And obviously you want to make sure all your unit tests pass. As a matter of practice I run the code coverage to see if there are big changes in that number. The current project I’m working on has about 94{f073afa9b3cad59b43edffc8236236232bb532d50165f68f2787a3c583ed137f} code coverage. We use a `.runsettings` file to control which libraries we analyze.

image

Following these steps can really improve the quality of your code and reduce bugs that escape. Just using this will typically catch misspellings in your Resources.resx file. If you get too many warnings these will slip by you and make it to your customer.

I’m sure there are some good posts on how to create and edit options in a Toolbar in Visual Studio 2015.

New Horizontal Tab Group?

Why is that in the quality bar? I routinely will use that to split my view so that my unit test is in the top group while the code I’m working on is in the bottom group. I think quickly arranging things so you can see your tests and code at the same time really helps your quality.

Productivity Power Tools 2015

These tools are great, and probably many of you have already found this Visual Studio 2015 extension. They really help when trying to review code changes.

The Benefit

Today I had to compare a file from two different points in time. Unfortunately, some developers had the productivity tools and others did not. As a result I had to painstakingly look at many lines where the difference might have been “this=that” rather than “this = that”.

Getting it Setup

Here are the settings that would have helped that situation… First make sure you have the tools:

image

Then go to the Tools –> Options… Productivity Power Tools, PowerCommands:

:image

With these settings your files will be kept tidy for proper formatting as well keeping the using statements under control.

But… make sure your fellow developers don’t go changing the definition of the format. Example, if some decides they like a Tab size of 5 rather than 4, then every line in your fill will show as changed between that developer and any version others worked on. Just leaves those defaults alone!

There are obviously lots of other cool things these tools can do… Here’s a link to their site. And they’re on Facebook as well, “Productivity Power Tools – Software

Long Live Live Writer!

I was so happy to see this on my most recent quest to install Live Writer when I got a new computer! http://www.computerworld.com/article/2934449/windows-apps/its-alive-microsoft-to-let-live-writer-live-on-as-open-source.html

This application does what it needs to do and makes it very easy to do attractive blog posts! I’m happy to help (if I can).

Skype for Business Location

Headline: If you have an entry in the “What’s happening today?” text box, that will show up. If you don’t, then the location will show up.

I want to see location information

As best I recall in Lync 2010 I would see a user’s name and status on one line, their “What’s happening today” on another, and the location on yet another. Lync of course was recently (mid 2015) renamed to Skype for Business. But even in Lync 2013 I didn’t see the location information.

How it works

After lots of trial and error I discovered the following:

If a user has set their location and checked “Show Others My Location” then you will see their location.

HOWEVER – if a user types in something into the “What’s happening today?” field, you’ll see that instead of the location!

Best Practice – If you do put something into “What’s happening today?” and you travel a fair bit, include your location in that text.

TDD Series for MVC 5

Here is a series of posts by Eric Vogel on testing MVC 5 applications:

Attain Code Management Nirvana via Test-Driven Development, Part 1

Oh, CRUD … It’s Test-Driven Development for ASP.NET MVC, Part 2

TDD for ASP.NET MVC, Part 3: Contact Service Class

Dynamically Load Bootswatch Themes

This post shows how I dynamically load a user’s selected theme in an MVC 5 application that’s using Bootstrap and Bootswatch.

App_Themes Folder

I didn’t use use that… So you can skip this section if you like.

In the past, different themes were placed in different folders and you could just enumerate the subdirectories in ~/App_Themes. But Bootswatch doesn’t use that.

Bootswatch Install Location

Bootswatch places two files in your ~/Content folder: 1) bootstrap.<theme name>.css, and 2) bootstrap.<theme name>.min.css.

Available Themes Code

So I just search that directory and look for all the files matching the “bootstrap.*.min.css” pattern and let the user select the one they want.

AvailableThemes
  1. /// <summary>
  2. /// Helps find available themes so the user can choose one. Alwo helps
  3. /// find the selected theme for loading dynamically.
  4. /// </summary>
  5. public static class AvailableThemes
  6. {
  7.     public const string ContentDirectory = "Content";
  8.     internal static ICollection<string> GetThemesList(HttpRequestBase request)
  9.     {
  10.         return GetThemesList(request.PhysicalApplicationPath);
  11.     }
  12.  
  13.     public static ICollection<string> GetThemesList(string physicalApplicationPath)
  14.     {
  15.         var themes = new Collection<string>();
  16.         var dir = Path.Combine(physicalApplicationPath, ContentDirectory);
  17.         var dirInfo = new DirectoryInfo(dir);
  18.         foreach (var themeFile in dirInfo.GetFiles("bootstrap.*.min.css", SearchOption.TopDirectoryOnly))
  19.         {
  20.             var parts = themeFile.Name.Split(new[] { '.' });
  21.             // Based on our filter search pattern we know we'll have at least 2 parts.
  22.             var themeTitle = CultureInfo.CurrentCulture.TextInfo.ToTitleCase(parts[1]);
  23.             themes.Add(themeTitle);
  24.         }
  25.         return themes;
  26.     }
  27.  
  28.     public static string GetThemeFile(string themeName)
  29.     {
  30.         return "/" + ContentDirectory + "/bootstrap." + themeName + ".min.css";
  31.     }
  32.  
  33.  
  34.     public static string GetValidTheme(HttpRequestBase request, string savedThemeName)
  35.     {
  36.         return GetValidTheme(request.PhysicalApplicationPath, savedThemeName);
  37.     }
  38.  
  39.     /// <summary>
  40.     /// If the user's saved theme name is still available use it. If they are using
  41.     /// a theme that has sense been uninstalled, then just have them use the first
  42.     /// available theme.
  43.     /// </summary>
  44.     /// <param name="physicalApplicationPath">The physical directory location.</param>
  45.     /// <param name="savedThemeName">The name of the theme the user has chosen.</param>
  46.     /// <returns>A valid theme name.</returns>
  47.     public static string GetValidTheme(string physicalApplicationPath, string savedThemeName)
  48.     {
  49.         var themes = GetThemesList(physicalApplicationPath).Select(t => t.ToLowerInvariant());
  50.         if (themes.Contains(savedThemeName.ToLowerInvariant()))
  51.             return savedThemeName.ToLowerInvariant();
  52.         return themes.First();
  53.     }
  54. }

Then the Razor File

This is the code from the Views/Shared/_Layout.cshtml file (toward the top). So 3 lines of code allowing us to have the right bootstrap.*.min.cs filename to load.

_Layout.cshtml
  1. @{
  2.     ViewBag.Title = "Google Maps Filter";
  3.     //Layout = null;
  4.     // Get the user's saved theme.
  5.     var savedThemeName = SettingsController.GetTheme(Request);
  6.     // Validate the theme. If it no longer is available, then return the first available theme.
  7.     var themeName = AvailableThemes.GetValidTheme(Request, savedThemeName);
  8.     // Now get the actual file to load using Syles.Render.
  9.     var boostrapThemeCss = AvailableThemes.GetThemeFile(themeName);
  10. }
  11. <!DOCTYPE html>
  12. <html>
  13. <head>
  14.     @*Load the user's selected theme*@
  15.     @Styles.Render(boostrapThemeCss)


Summary

It’s it quite easy to dynamically load the Bootswatch Bootstrap themes using well tested C# and Razor syntax rather than javascript as I’ve seen in so many places. This keeps your code much cleaner. And again, if you add new themes, you can find them easily to present to your user. Using the NuGet install you would just add one, then you don’t need to change a single line of code for everything to work. Again, the same is true if you uninstall an existing theme.